Regularly checking the fluid levels in your car or truck is one the simplest ways to help ensure it runs properly and lasts for years. It’ll help you spot potential problems, like leaks or contamination, and fix them before they spiral out of control into costly repairs. It’s a good rule of thumb to check fluids monthly. Here’s how to check fluids in a car.
Locating dipsticks and fluid reservoirs in most cars is fairly easy, but check your owner’s manual for precise locations. A dipstick can be buried in an out-of-the-way place on some cars. On my Honda CR-V for example, the transmission fluid dipstick is behind the battery and tucked under the headlight housing. It’s nearly impossible to see unless you know where to look.
Let’s get started.
How to check motor oil
How to check transmission fluid
How to check brake fluid
How to check power steering fluid
How to check differential fluid
How to check coolant
How to check motor oil
Motor oil lubricates, cools and cleans internal engine parts. On some engines equipped with variable valve timing (VVT), it functions as a hydraulic fluid to actuate components. Your engine needs the correct volume of high-quality motor oil to protect against wear, fight damaging heat and combat harmful deposits.
When checking fluids in a car, check the oil level at least monthly, and more often if you suspect a leak or your engine burns oil. Consult the owner’s manual for the correct motor oil viscosity and oil-change interval. It’ll also provide the performance specifications the oil must meet, such as API SP or GM dexos1 Gen 2. The AMSOIL Product Guide also recommends the correct oil for your engine.
- Ensure the engine is cool and the vehicle is parked on level ground.
- Locate the motor oil dipstick and withdraw it from the engine.
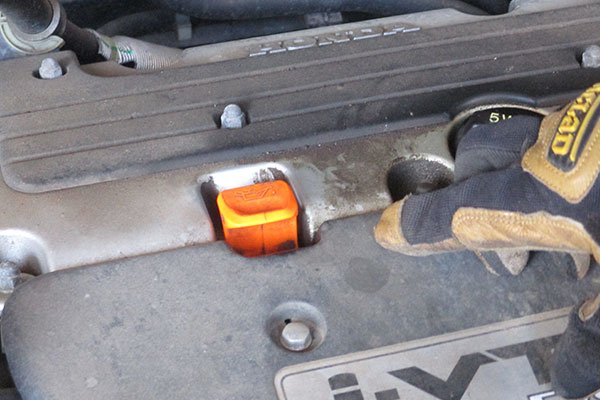
- Wipe off the oil and reinsert it into the dipstick tube, ensuring it seats all the way.
- Withdraw it again and check the level using the indicators on the dipstick.
- Top off the engine if the oil is low (as shown below) and recheck the level.
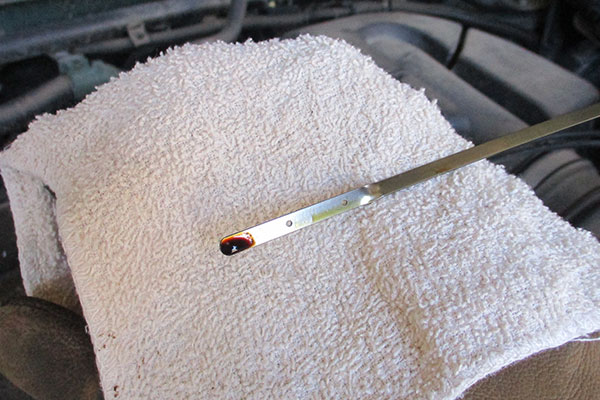
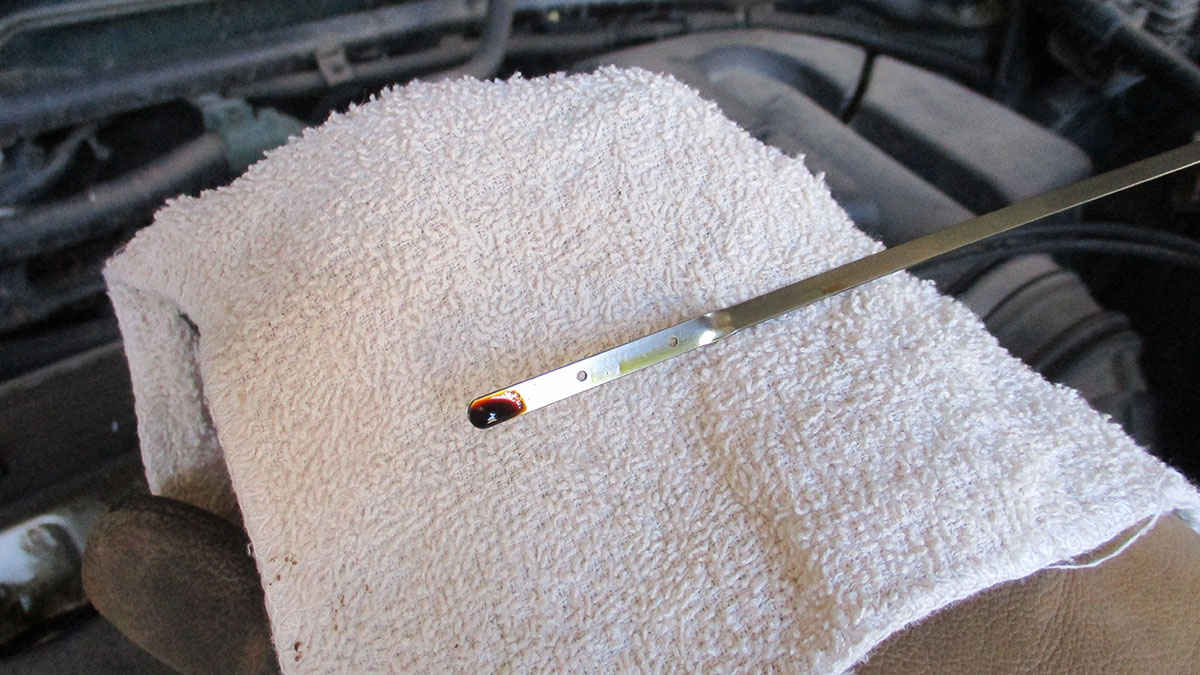
Check oil condition
Now’s the perfect time to check the condition of the oil.
While oil analysis is the best way to identify possible contamination or other red flags, a quick visual check can alert you to potential problems that need attention.
Ideally, the oil should be nearly translucent or amber in color. That’s a sign the oil is fairly new and hasn’t accumulated many miles or hours. If the oil is black, that’s not necessarily a sign that it’s worn out – it indicates the additives in the oil are holding contaminants in suspension and doing their job. Check out this post for more on why motor oil turns black.
Oil that looks frothy or like chocolate milk is a sign of water/coolant contamination. If that’s the case, see a mechanic right away because you probably have a head gasket leak or other major problem on your hands.
Oil that appears or feels thin may indicate fuel dilution, which occurs when gasoline or diesel contaminate the oil. Smell the oil on the dipstick. Does it smell like fuel? That could be a problem. If so, used oil analysis is your best method to find out if, indeed, you have a fuel-dilution issue.
Oil that feels gritty or dirty when rubbed between your fingers may indicate the presence of contaminants that bypassed the oil filter, likely because it’s filled to capacity. If that’s the case, change the oil.
How to check transmission fluid
Transmission fluid is just as important as motor oil, but it’s often overlooked since it requires less-frequent changing. The fluid serves several important functions, such as protecting against gear and clutch wear, fighting damaging sludge and cooling hot-running components.
Although the method for checking automatic transmission fluid is similar for most vehicles, check your owner’s manual just in case.
- The engine should be warm and idling. Ensure the vehicle is parked on a level surface. With your foot on the brake, cycle through all the gears. Place it in park and activate the parking brake. It’s also a good idea to chock the wheels.
- Locate the dipstick (if equipped) and withdraw it from the tube. Some vehicles use a “filled-for-life” transmission, which supposedly doesn’t require fluid checks or changes. As such, they don’t have a dipstick. Even so, it’s a good idea to change fluid on these units at least one in their lifetime, as we explain here.
- Wipe the dipstick clean and reinsert it into the tube until firmly seated. Withdraw it and check the fluid level using the indicators on the dipstick.
- If needed, add the correct fluid (check your owner’s manual or the AMSOIL Product Guide) until full. On most vehicles, the dipstick tube serves as the fill hole, so you will probably need a long-neck funnel with a narrow opening.
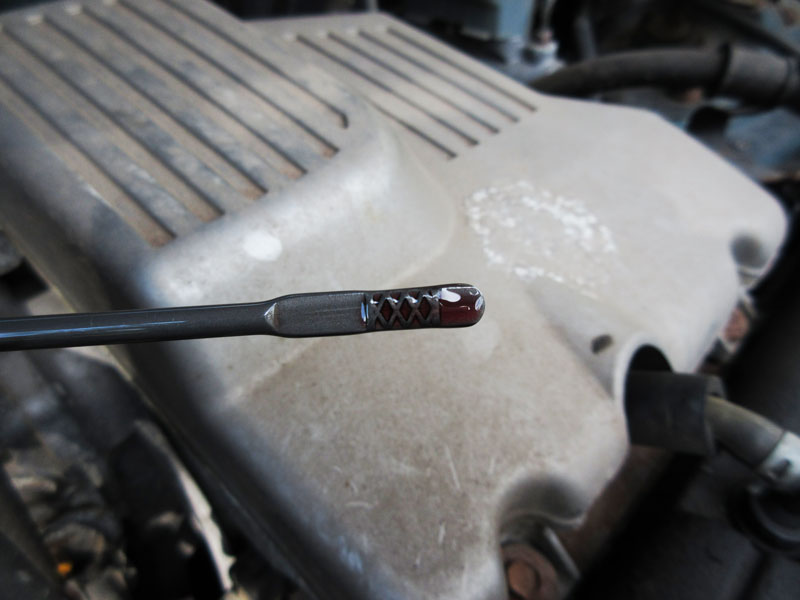
Check fluid condition
Drip a little fluid on a clean white rag or sheet of paper. It should be red. Fluid that’s dark or smells burnt means it’s likely time for a change. Again, fluid analysis is the best way to determine if the fluid is worn out, but if you haven’t changed transmission fluid in years (or ever) and it appears dark, it’s a good idea to change it before the transmission starts to shift hard, jerk or hesitate.
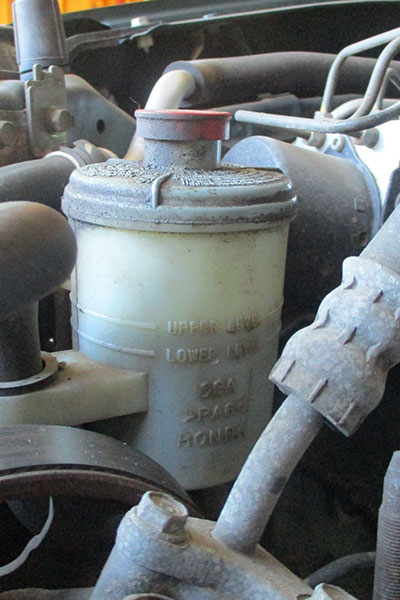
How to check brake fluid
- Most vehicles house the brake fluid in a small, clear reservoir, often near the firewall. The reservoir includes “MIN” and “MAX” indicators. Simply ensure the fluid falls somewhere in between. Check the fluid level with every oil change.
If you need to add fluid, ensure you use a fluid of the proper DOT classification. Find that information in your owner’s manual or using the AMSOIL Product Guide. Remove the reservoir cover and add fluid until reaching the “MAX” line.
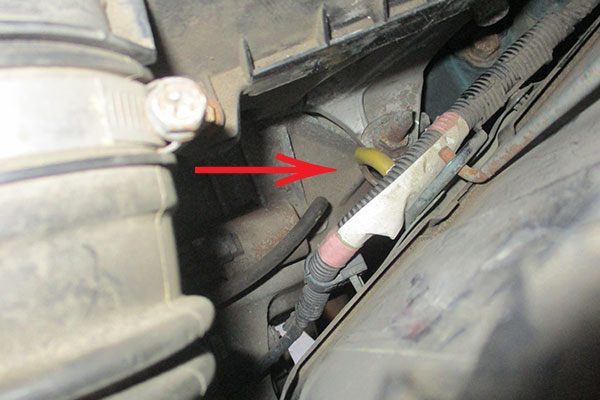
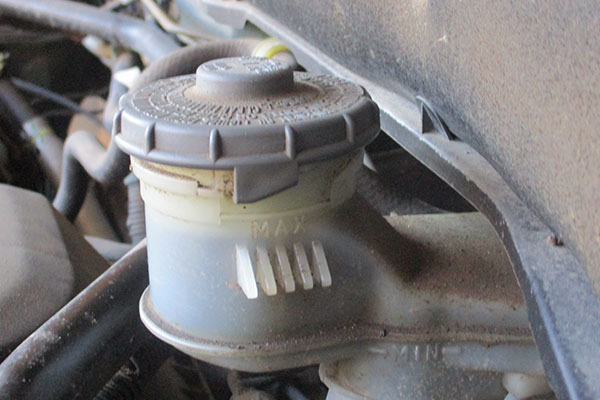
How to check power steering fluid
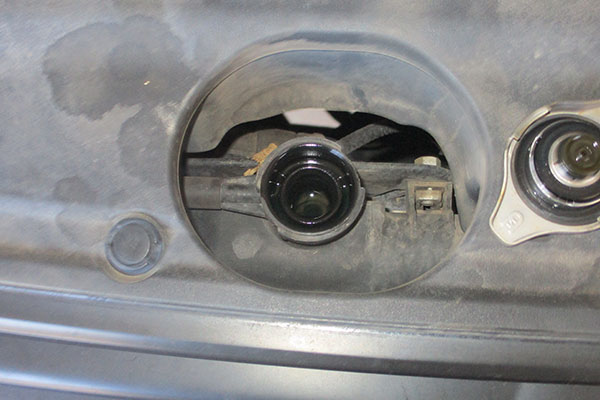
This process is similar to checking brake fluid and should be done with every oil change. Most vehicles have a power-steering-fluid reservoir attached near a fender. Check that the fluid level is between the “MIN” and “MAX” indicators on the reservoir.
- Sometimes, the cap includes a short dipstick. Remove the cap and check the fluid level using the dipstick indicators.
- One important note: some vehicles include markings that indicate the reservoir is “full hot” or “full cold.” Ensure you reference the proper marking depending on if the engine is hot or cold.
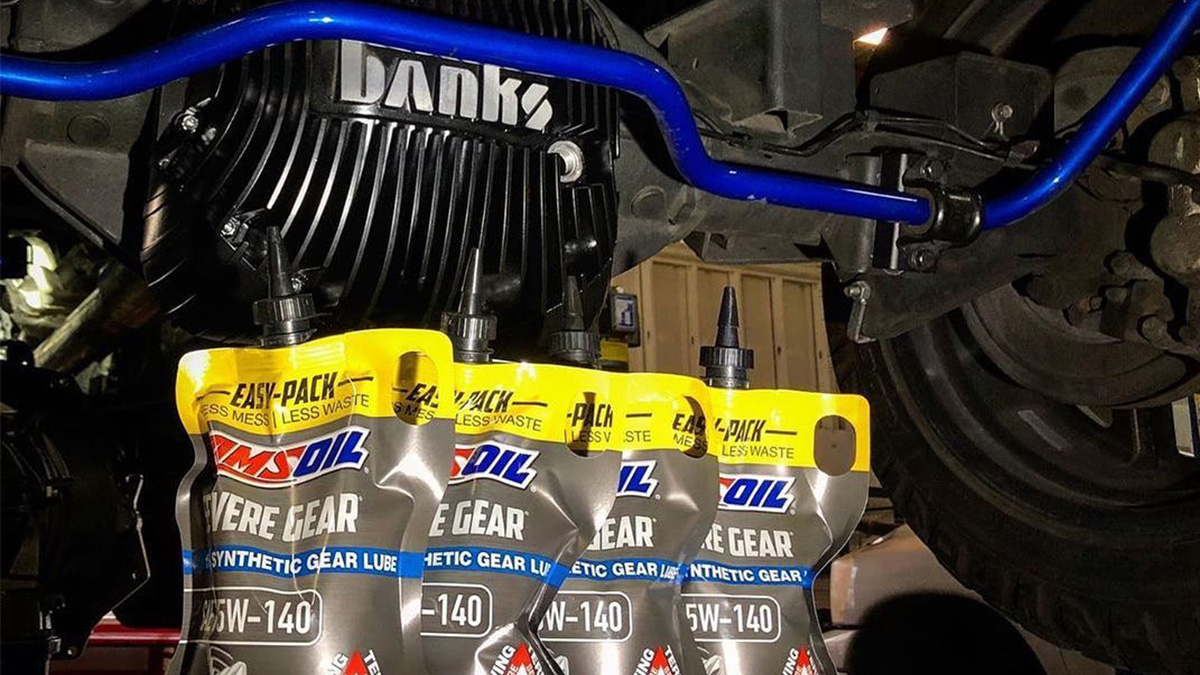
How to check differential fluid
Too often, the differential is out of sight, out of mind. It’s easy to neglect checking or changing the fluid since change intervals can exceed 100,000 miles (160,000 km) on some vehicles. And, like “filled-for-life” transmissions, some newer units don’t require fluid changes (allegedly) and don’t include fill or drain plugs for checking fluid.
- On traditional differentials, locate the fill plug, usually halfway up the differential cover. Some models have two separate plugs, one for draining fluid and one for adding fluid. Some only have a fill port and require removal of the cover to drain the fluid.
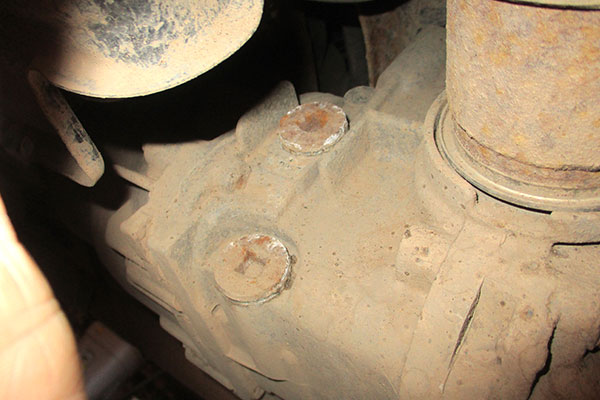
- Clean any mud or dirt from around the fill port, then remove the plug. It’s often a 3/8″ hex plug rather than a traditional bolt head.
- Insert your finger into the fill port and feel for the fluid level. It should come up to the bottom of the fill port.
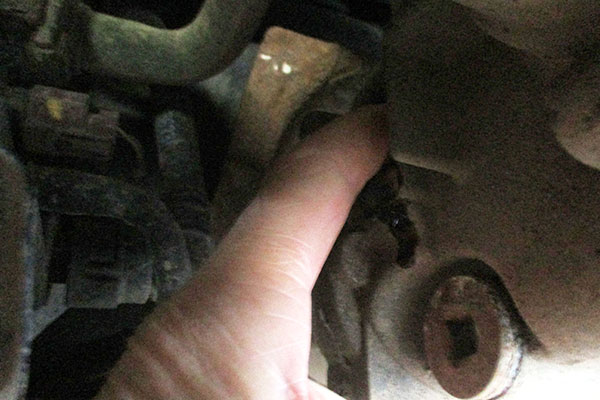
- If needed, add the proper viscosity and type of gear lube (check your owner’s manual or the AMSOIL Product Guide) until it reaches the bottom of the port.
Anyone who has changed gear lube knows the frustration of trying to finagle a rigid plastic bottle into place and squeeze the contents of the bottle into the differential. Using a gear-lube pump is nearly as frustrating and messy.
Opt for the AMSOIL easy-pack instead, which reduces mess, hassle and waste, making this chore much easier and faster.
Check differential fluid condition
As with your vehicle’s other fluids, now’s the ideal time to check gear lube condition. Fluid that appears milky indicates water contamination. Check for grittiness, too, which could indicate gear or bearing wear. It could also means rust has formed and flaked off into the gear lube. In these cases, change the gear lube.
How to check antifreeze/coolant
It’s a good idea to check coolant monthly.
- Always ensure the engine is cool before removing a radiator cap. Hot, pressurized fluid can burn you, so let the car sit for a couple hours before checking coolant.
- Locate the coolant reservoir, which is a fairly large plastic tank near the radiator. Ensure the coolant level falls between the “MIN” and “MAX” marks.
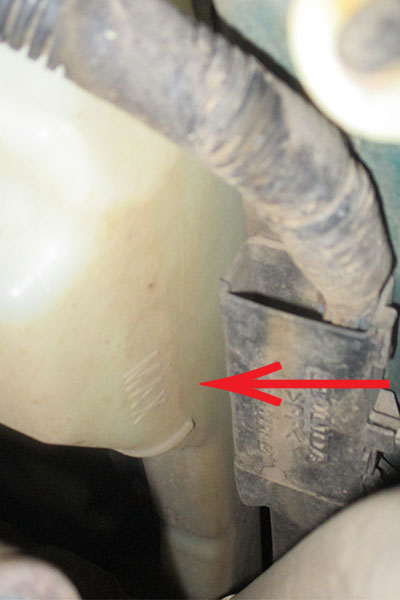
- If needed, add the proper coolant (check your owner’s manual or the AMSOIL Product Guide) directly to the reservoir until the level reaches the proper mark.
- With the engine cool, it’s also a good idea to remove the radiator cap and ensure the coolant reaches the bottom of the filler neck. Check coolant condition and look for slime or sludge in the radiator, which is a sign of contamination.
Hopefully, this post has shown you how to check fluids in your car so that you can ensure your vehicle is in top shape and will last for years.

Comments
Share: